Mastering the "One-Way Glass": Tips from Ecotours’ Professional Photography Guides


Mastering the "One-Way Glass": Tips from Ecotours’ Professional Photography Guides
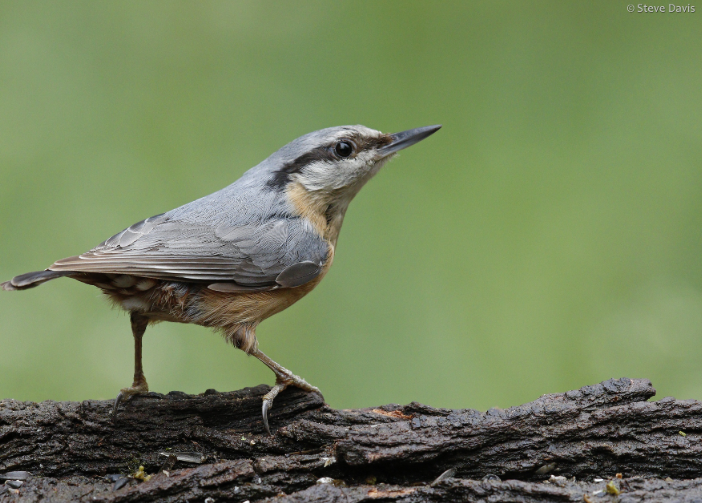
For the wildlife photographer, the "Holy Grail" is a contradiction in terms: we seek intimacy without intrusion. We want to fill the frame with the texture of a Golden Eagle’s feathers or the glistening eye of an Otter, yet we must remain completely undetectable. The moment the subject knows you are there, the behavior changes, the stress levels rise, and the authentic moment is lost.
For decades, the solution was the ghillie suit or the cramping misery of a camouflage tent, battling mosquitoes and stiffness for hours. But in the pristine wilderness of Hungary, the game has changed.
Ecotours has pioneered a network of "Invisible Hides" that utilize high-tech, optical-grade one-way glass (often referred to as "spy glass"). To the uninitiated, shooting through glass sounds like heresy—a recipe for glare, loss of sharpness, and autofocus errors.
However, when engineered correctly, this glass is not a barrier; it is a portal. It turns the chaotic wilderness into a controlled studio environment. We sat down with the master guides and imaging experts at Ecotours to deconstruct the physics, the technique, and the art of shooting through the invisible wall.
Part I: The Physics of Invisibility – Why Not All Glass is Created Equal
The first question every pro photographer asks is: "How much light do I lose, and what happens to my sharpness?"
It is a valid concern. Standard architectural one-way glass is disastrous for photography. It eats 2-3 stops of light and introduces a heavy green or blue color cast.
The Ecotours Difference: Ecotours does not use architectural glass. Their hides are equipped with specialized optical-grade beamsplitter glass.
-
Light Transmission: The loss is calibrated to approximately 1.3 to 1.5 stops. With modern full-frame sensors (Sony A1, Nikon Z9, Canon R3) capable of clean files at ISO 6400 and beyond, this light loss is negligible compared to the advantage of proximity.
-
Neutrality: The coating is designed for color neutrality. There is no need for heavy post-production color grading to remove a tint.
-
The "Mirror" Effect: From the outside, the coating reflects the environment (sky, water, trees). The subject sees its own reflection or the landscape, not the predator (you) sitting two meters away.
This technology allows for a proximity that is physically impossible with open-front hides. You can have a Red-footed Falcon land 4 meters away. At 4 meters, with a 600mm f/4 lens, the detail is not just sharp; it is clinical.
Part II: The Setup – Inside the "Cockpit"
Stepping into an Ecotours hide feels less like a camping trip and more like entering the cockpit of a surveillance aircraft.
1. The Stability Factor
Vibration is the enemy of sharpness, especially at long focal lengths. In a standard tent, you are on a tripod on uneven ground. Ecotours hides feature heavy-duty, bolted mounting plates or weighted shelves.
-
The Tip: Leave the tripod legs at the hotel. Ecotours hides are designed for Gimbal Heads (Wimberley or similar) or high-quality bean bags (provided). The shelf is bolted to the structure, independent of the floor. This means if your neighbor shifts their weight or sneaks a sandwich, your lens does not shake.
2. The Eye-Level Advantage
Composition is king. The most compelling wildlife images are shot at the subject's eye level.
-
The Design: Ecotours "Water Hides" are sunken into the earth or float on pontoons so that the lens shelf is just centimeters above the waterline.
-
The Result: This low angle pushes the background far away, creating that creamy, buttery bokeh that separates the subject from the clutter. You get the "infinity pool" effect on the water, turning a muddy pond into a silken mirror.
Part III: The Nemesis – Managing Reflections
The biggest challenge of shooting through one-way glass is internal reflection. If the inside of the hide is brighter than the outside, or if you have shiny objects near the glass, the camera will see a ghost image.
Ecotours Pro Tip #1: Total Blackout "You must become a shadow," says [Name], a senior Ecotours guide.
-
Clothing: Wear long sleeves. Black is non-negotiable. Even a watch face or a white logo on a t-shirt can reflect in the glass and ruin the contrast of your image.
-
Equipment: Cover any branding on your camera body with black gaffer tape. The white "Canon" or "Sony" logo can appear as a ghostly smear in the final image.
-
Tally Lights: Turn off the AF assist beam and the red "write" lamp on the back of the camera.
Ecotours Pro Tip #2: The Lens Skirt While Ecotours provides dark curtains that wrap around the lens, the pro move is to bring a "Lens Skirt" or a simple black microfiber cloth.
-
Technique: Drape the cloth over the barrel of the lens and tape it to the glass (or use the provided suction cups). This creates a physical seal of darkness between your front element and the glass, guaranteeing zero reflection even if you check your phone behind the camera.
Part IV: Autofocus and Sharpness Techniques
Shooting through a thick pane of glass changes the optical formula slightly. Here is how to compensate to ensure tack-sharp eyes every time.
1. Perpendicularity is Key
Physics dictates that refraction increases as the angle of incidence becomes steeper.
-
The Rule: Shoot as straight through the glass as possible.
-
The Limit: Ecotours guides advise keeping your panning angle within 30 degrees left or right of center. If you pan 45 degrees or more, you are shooting through "thicker" glass effectively, and you may introduce chromatic aberration or "smearing" in the corners.
-
The Fix: If the bird lands far to the left, don't pan the lens to the limit of the glass. Move your chair and your body to the left, so you remain perpendicular to the subject.
2. Minimum Focus Distance (MFD)
One of the "problems" with Ecotours hides is that the birds come too close.
-
The Scenario: You have a 600mm prime lens with an MFD of 4.5 meters. A Kingfisher lands on the perch 3 meters away. You are locked out.
-
The Gear Advice: Bring a zoom. A 100-400mm or 200-600mm is often the MVP (Most Valuable Player) in an Ecotours hide. The flexibility allows you to pull back for the environmental shot or zoom in for the headshot.
-
The "Switch": Many pros carry two bodies. One with a prime (400mm f/2.8 or 600mm f/4) for the distant action, and one with a 70-200mm f/2.8 for the "too close" moments.
3. Contrast Detection vs. Phase Detect
Modern mirrorless cameras (Sony A1, Canon R5, Nikon Z9) handle the glass significantly better than older DSLRs. The glass can slightly reduce micro-contrast.
-
Setting Tip: If you find the AF hunting, try stopping down just 1/3 of a stop (e.g., from f/4 to f/4.5). This slight increase in depth of field often helps the AF system bite onto the texture of the subject.
Part V: The "Studio" in the Wild – Scene Management
What truly separates Ecotours from a DIY tent is the curation of the environment. These hides are essentially open-air studios.
1. The Perch Management
"A great bird on an ugly stick is an ugly photo," is the Ecotours mantra. The guides are meticulous "gardeners."
-
Distance Control: The perches are positioned at specific distances from the background to ensure the background is completely blown out (smooth bokeh), while the subject is within the prime focal range.
-
Texture: They use moss-covered branches, old weathered wood, or reed flowers that are native to the specific habitat.
-
The "Swap": If you are spending a week in a hide, the guide can swap the perch. Want a clean look? They install a smooth drift-wood branch. Want texture? They bring in lichen. You are the Art Director.
2. Light Direction
Ecotours hides are oriented by compass.
-
Morning Hides: Oriented West, looking East. You get the golden backlight or side-light at dawn.
-
Afternoon Hides: Oriented East, looking West. You get the warm, golden hour light hitting the front of the subject.
-
Backlight Mastery: Because the glass protects your eyes (and the sensor) from direct glare, shooting directly into the sunrise for silhouette shots is easier and more comfortable than in the open.
Part VI: The Exposure Strategy
How do you expose when you are losing 1.3 stops and shooting a moving target?
ISO is your Friend Don't fear the grain.
-
The Strategy: In the pre-dawn gloom, you might be at ISO 12,800. The Ecotours glass is neutral, so the noise will be monochromatic and easy to clean in Topaz DeNoise or Lightroom.
-
Shutter Speed: Do not compromise here. If a Red-footed Falcon is mating, you need 1/2500s or 1/3200s. Underexpose by a stop if you must (to save highlights), but keep the shutter speed up.
Check the Histogram The glass can sometimes fool the camera’s metering system (evaluative/matrix metering) because the "black" of the hide interior might affect the reading.
-
The Tip: Use Zebra Stripes set to 100%+ or check your histogram constantly. Expose to the right (ETTR) to maximize data, as shadow recovery through glass is slightly less forgiving than open air.
Part VII: Beyond the Birds – Macro and Mammals
The one-way glass isn't just for avian photography.
The Golden Jackal Challenge Mammals rely heavily on scent and hearing. The glass hide acts as a scent containment unit.
-
Sound Discipline: While the glass muffles sound, it is not soundproof. Ecotours hides are carpeted to dampen the sound of dropped lens caps or shuffling feet. The "Silent Shutter" (electronic shutter) on modern cameras is a must-have feature for mammals like Jackals or Deer that are within 10 meters.
The Macro Opportunity Because you can move inside the hide, you can shoot unique perspectives.
-
Split-Level: In the water hides, if the water level is right, you can press the lens against the bottom of the glass to get a near-surface view of frogs or swimming snakes, creating a "split-level" feeling that is impossible from a bank.
Part VIII: Why Ecotours Infrastructure is the Industry Standard
There are other hides in Europe. Why do camera brands and top-tier pros choose Ecotours?
It comes down to reliability and maintenance. A glass hide is a living organism. It needs care.
-
Cleaning: The glass must be cleaned daily. A smudge, a spiderweb, or dust on the outside of the glass will ruin the contrast when the sun hits it. Ecotours guides clean the glass before you arrive, ensuring a pristine optical surface.
-
Climate Control: Condensation is the enemy. If the hide is cold and you breathe on the glass, it fogs. Ecotours hides are ventilated and, in winter, heated. This prevents the "fogging" that plagues amateur setups.
Conclusion: The Ultimate Creative Tool
Shooting through Ecotours' one-way glass requires a slight adjustment in mindset. You have to trust the tech. You have to embrace the darkness of the hide.
But the reward is a portfolio of images that stand apart. You get the "impossible" shots: the intimate preening, the direct eye contact of a predator, the natural behavior of a shy species that has no idea it is being watched.
It is the closest you will ever get to being invisible. And for a photographer, invisibility is the ultimate superpower.
Sidebar: The Gear Bag – What to Pack for an Ecotours Trip
-
Fast Glass: f/2.8 or f/4 primes are ideal to offset the light absorption of the hide glass.
-
The Zoom: A 100-500mm or 200-600mm for flexibility.
-
Gimbal Head: Essential for smooth panning and weight management.
-
Black Clothing: A hoodie, gloves, and even a black face mask (balaclava) can help eliminate reflections.
-
Lens Skirt/Cloth: A black microfiber cloth to drape over the lens barrel.
-
Short Tripod Column: If you bring your own tripod head, ensure you can mount it to a shelf (3/8" thread).
Sidebar: Spec Sheet – The Ecotours Glass
-
Type: Optical Grade Beam-Splitter (4mm - 6mm thickness).
-
Transmission: ~45-50% Light Transmission.
-
Reflection: ~50% Reflection (External).
-
Coatings: Anti-scratch, neutral density color profile.
-
Mounting: Angled slightly downwards (5 degrees) to reflect the ground/water rather than the sky, enhancing the "mirror" effect for the animals.